
A Step-by-Step Pictorial Guide to Setting up Win95 TCP/IP
I. Setting up your PC's network
1. Click (when I say click, I mean "click the left button of the mouse". Right-click means click the right button) Start, then Settings, then Control Panel. Then double-click the Network icon. If your PC already has TCP/IP protocol installed, you will see a window as in Picture 1. If this is the case, skip to step 5.
Picture 1
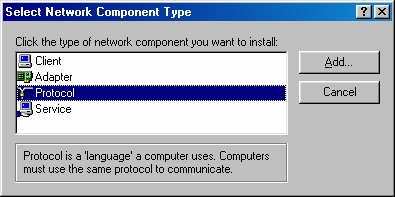
2. If your PC has not had TCP/IP installed yet, click the Add button to get Picture 2. Click on Protocol, then Add (alternatively, just double-click Protocol). You will get Picture 3.
Picture 2
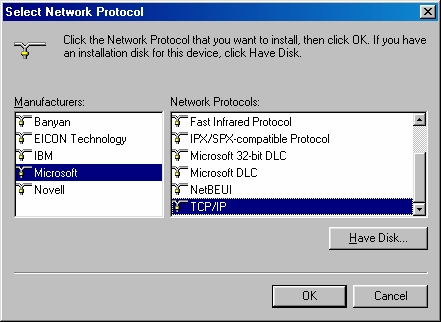
3. Click on Microsoft in the left panel, then scroll the right panel down and choose TCP/IP. Then click OK. Win95 will install all the TCP/IP drivers and tools (for example, the generic Telnet and FTP programs). You may need the Windows 95 CD-ROM for this. After the installation, just reboot the computer as asked.
Picture 3
II. Setting up a dial-up networking connection to your ISP
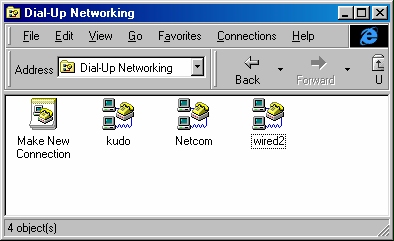
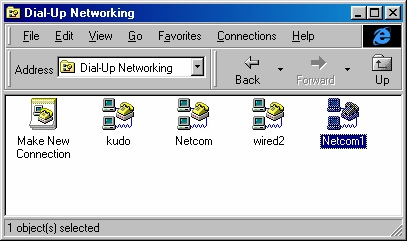
4. After Win95 reboots, double-click "My Computer" icon, then "Dial-up Networking" icon. Yours will look something similar to Picture 4. (Ignore the other icons; those are my ISP's either in the past or present. More on these later.) Double-click "Make New Connection" icon to get Picture 5.
Picture 4
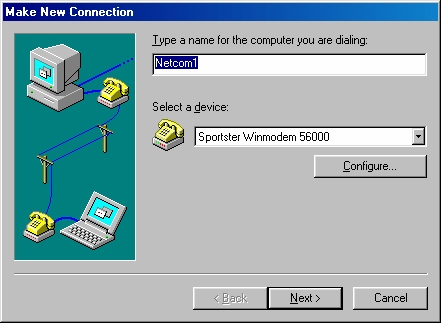
5. Enter a name under "Type a name for the computer you are dialing:". Here, I just call it Netcom1. If you are dialing into a campus modem, either the modems supported by the central campus or by the EML, call it appropriately "socrates" or emily6" or something like that. Look under "Select a device:" to see if that is the modem with which you want to connect to the ISP or the campus. Then click on Next to continue. You will get Picture 6.
Picture 5
6. Enter the ISP's (or campus) phone number (this is the number you will need to dial in to). Then click Next to continue. You will get Picture 7.
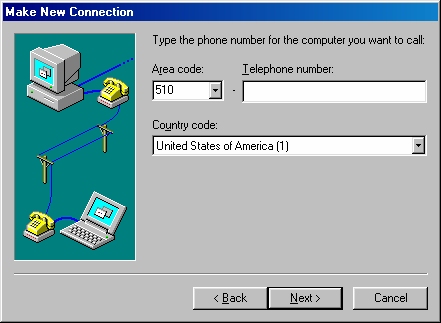
Picture 6
7. Click on Finish to finish. You will get a new icon named "Netcom1" (or your own chosen name, e.g., "emily6") as in Picture 8.
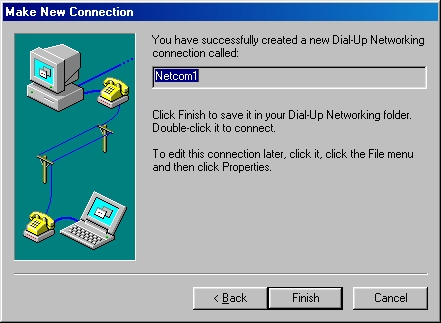
Picture 7
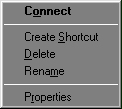
8. Right-click on Netcom1, then click on Properties. You will get Picture 9.
Picture 8
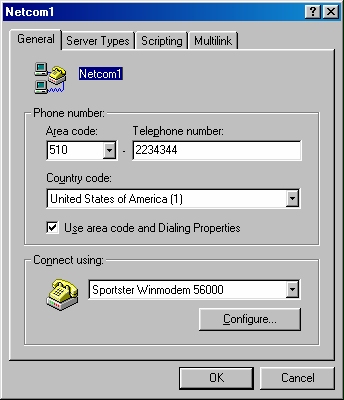
Picture 9
9. Click on the "Server Types" tab. Then Make sure the boxes are checked as shown in Picture 10.
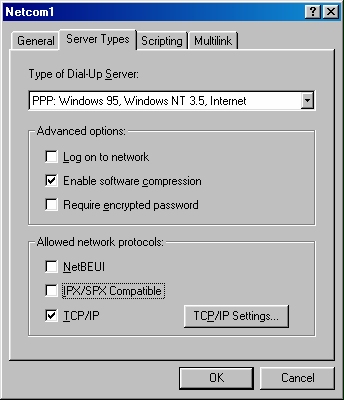
Picture 10
That is: only check the "Enable software compression" and "TCP/IP" boxes. (It does depend on how your ISP is configured, but this is usually the case from my experience.) Then click "TCP/IP Settings" to get Picture 11.
10. Usually, your ISP uses dynamic IP addressing, so for the top panel, choose "Server assigned IP address". Enter the ISP's primary and secondary (the latter if necessary) DNS server addresses. For campus home-ip users, the DNS addresses are 128.32.16.9 and 128.32.135.52. If you are dialing into the EML modems, you would specify 0.0.0.0 (see "help ppp" for details). The DNS information is the same as for home-ip users.
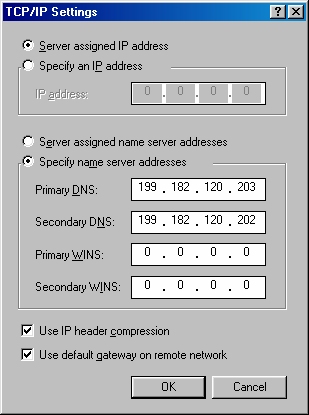
Picture 11
11. Click on a series of OK to finish the setup.
III. Connecting to your ISP
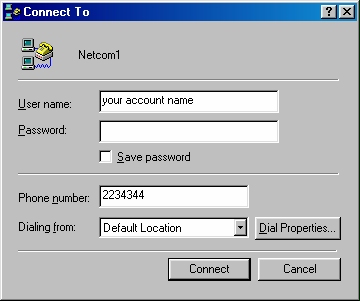
12. Double-click the newly created icon (in this example, Netcom1) and you will get Picture 12. Type in your account name and password, then click Connect to dial up.
Picture 12
What is the box "Save password" for? Well, this is the "improved" Dial-up interface that comes with the newer Windows 95. If you bought your computer recently, then it is very likely that it came with this new version. The original Win95 version may not have this (I do not remember now). What this box is for is so that you do not have to type in your password every time you dial in. Obviously, it also means that anyone can connect to your account. So, beware. We recommend that you do not save your password!
The procedure varies slightly if you are not using scripts, especially if you are connecting to the EML. Instead of using Picture 12, "Connect To", go back to Picture 8, "Dial Up Networking", and do Properties -> Configure -> Options. Click on "Bring up terminal window before dialing." This will give you a terminal window when you dial in that prompts you for host and ppp connection and so forth. After you enter all the necessary information, there may be some garbage that appears on the screen. Just type F7 and you should get in.
IV. Caveats and FAQs
thach@socrates.berkeley.edu
Last modified: 21 August 1997